|
Designing an Art Cart
Art is form of creative expression; the art cart in a preschool classroom is a place where children can to go express themselves creatively. While it’s an important center to have, setting it up and keeping it stocked can be challenging. Sometimes materials are cluttered and “junky,” making the area unattractive to children and difficult for them to use appropriately. An art cart is designed to provide children with clear and easy access to art materials. The materials should each have a specific place on the shelves that is clearly labeled. Materials should be contained in attractive baskets, trays, or holders so that they are aesthetically pleasing. Standard tools for drawing, gluing, and cutting are basic items that should always be included. Throughout the semester, as the children become accustomed to using the art cart, additional materials can be added. These materials should add complexity and introduce new tools. |

|
|
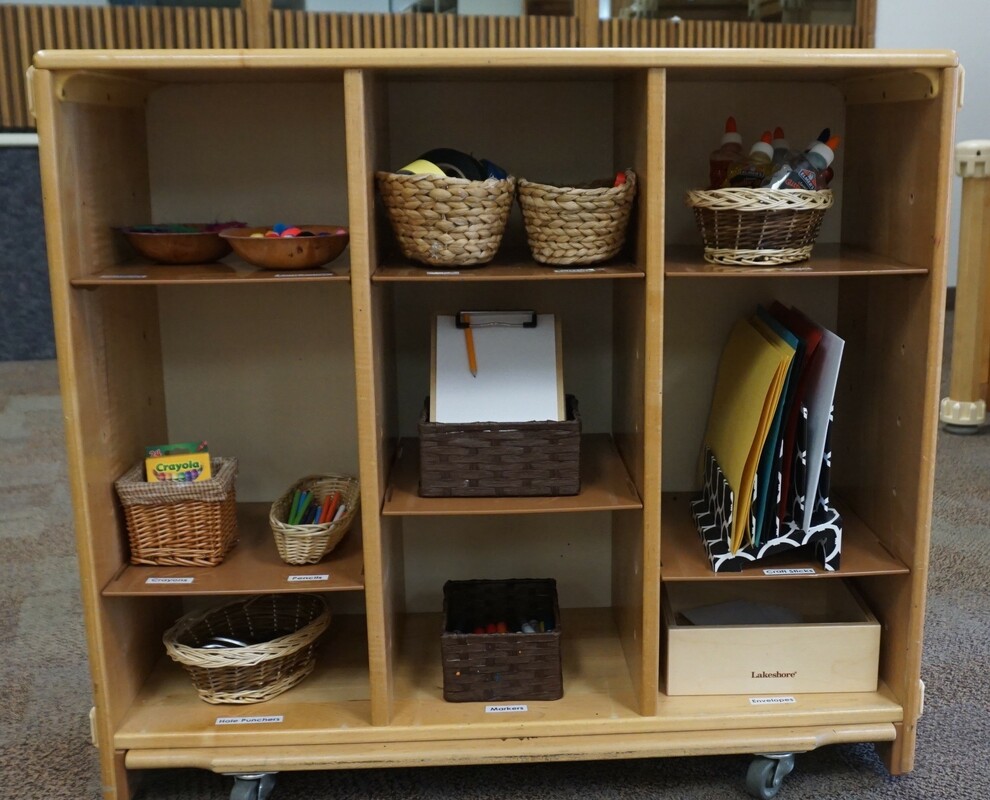
What an Art Center Should Look Like
|
|
What Children Learn and Do in the Art Center
Language and Literacy Learn vocabulary: color (bright, intense, dull, muted); line (wavy, curved); texture (rough, raised). Write: Signs (Please save Sarah’s playdough); Create recipe cards. Look at books about art techniques and artists. Describe and discuss children’s own artwork and then art of other artists. Math Experiment with balance as they make mobiles and sculptures. Make patterns with materials. Science Explore the properties and effects of light. Experiment with mixing paint colors to make new shades. Social Studies Learn from a hands-on experience. Recycle art materials - draw on both sides of the paper, save paper scraps, and use found materials (pine cones, seed pods, leaves, etc.) in collages. Physical Develop eye-hand coordination. Practice the tripod grasp, later used for writing. Use tools such as scissors, brushes, and hole punches. |
|
Choosing Materials for the Art Center
The art center should have many different options for children to choose from. The following list is some different examples that can be included on an art cart. It is important to be intentional in what is selected. Too many materials on an art cart is just as inappropriate as too few items.
Materials should start at a basic level of exploration and move toward greater complexity. New tools and materials should be introduced throughout the semester.
Keep in mind the developmental level of the children that you are working with because fine motor and cognitive skills are still developing. Be especially cautious about offering materials that are choking hazards to very young children, who may still be likely to place objects in their mouths.
Remember:
Materials should also be organized as part of clean-up at the end of each day. Materials that have been used and put back on the art cart by children should be discarded or sent home. Materials should be displayed in a way that would encourage and support creativity.
The art center should have many different options for children to choose from. The following list is some different examples that can be included on an art cart. It is important to be intentional in what is selected. Too many materials on an art cart is just as inappropriate as too few items.
- Paper (manila, construction, newsprint, computer, wallpaper books, magazines, catalogs, used greeting cards, etc.)
- Crayons, markers, pencils, chalk, and erasers
- Colored tape
- Children’s scissors (left- and right-handed), hole punch
- Paste, glue, tape
- Rubber stamps and ink pads
- Collage materials (scraps of fabric, yarn, ribbon, feathers, glitter, buttons, macaroni, any small "beautiful junk" items)
- Seasonal leaves, nuts, cones
- Recycled materials (yogurt cups, fabric, yarn, tissue paper, foil, bottles)
- Miscellaneous items for creativity
Materials should start at a basic level of exploration and move toward greater complexity. New tools and materials should be introduced throughout the semester.
Keep in mind the developmental level of the children that you are working with because fine motor and cognitive skills are still developing. Be especially cautious about offering materials that are choking hazards to very young children, who may still be likely to place objects in their mouths.
Remember:
Materials should also be organized as part of clean-up at the end of each day. Materials that have been used and put back on the art cart by children should be discarded or sent home. Materials should be displayed in a way that would encourage and support creativity.
